
The Writer’s Guide to the History of Blacksmithing
Posted on September 2, 2022 4 Comments

Blacksmithing has a long history. Only stone working is older. The craft was refined and advanced by trial and error and through interactions between cultures. The weapons and tools produced by these early smiths forged cities and countries.
As always, magic is the exception to the rule. Because magic.
The Copper Age
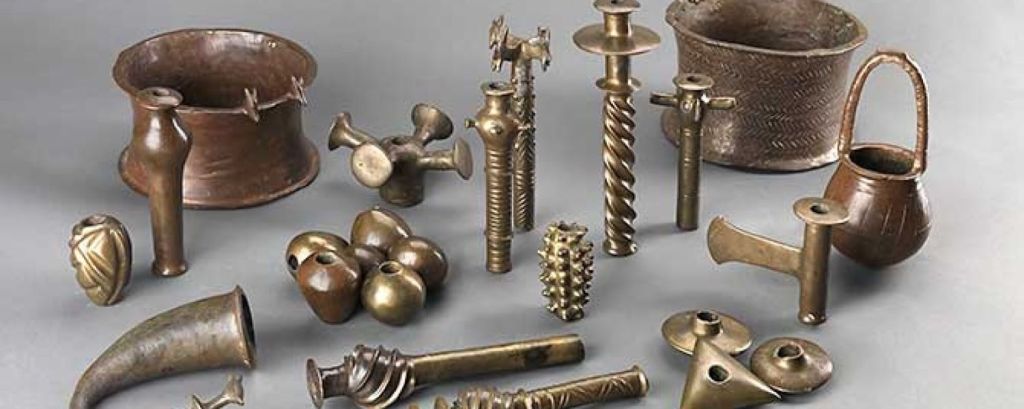
Between the Stone Age and the Bronze Age is the Copper Age or the Chalcolithic Age, which just means “copper stone” in Greek. [1] It lasted roughly from the late 5th to the 3rd millennia. Gold, silver, and copper were the first metals worked by humans since they are malleable and occur naturally. Elaborate shapes could be crafted from these metals and as well as tools and weapons hardened by long periods of light tapping known as work hardening. Evidence of copper smelting during this period was found in Serbia. [2]
The Bronze Age
Lasting from approximately 3,300 BC to 1,200 BC, this period saw the growing use of bronze and the development of advanced techniques, such as smelting, melting, casting, riveting, and forging. Bronze is a mixture of copper and either tin, arsenic, or other metals. It is harder than copper, more resistant to corrosion, and has a lower melting point, making it easier to melt and cast. [3] Just like copper, bronze cannot be tempered with heat but must be work hardened. Bronze smithing appears to have originated in the Middle East with the Indus River Valley civilianization, but it spread across Asia, Europe, and Africa. It was also developed in the Americas with the Incas, the Moche civilization, and the Calchaquí people of Argentina, all possessing the technology. [4]

The Iron Age
The Bronze Age ended with a period of sudden and violent social collapse. Even today, we are unsure of the cause, although natural disasters and invasions are common theories. The Late Bronze Age Collapse engulfed most of southeast Europe, west Asia, and North Africa. The knowledge of smelting and working iron developed in Anatolia, where it was closely guarded. With the collapse of their empire, the knowledge rapidly spread throughout the Middle East, Europe, Asia, and Africa.

The Steel Age
Unlike the sudden transition from the Bronze Age to the Iron Age, the development of steel was sporadic and uneven. Steel is an alloy of iron and carbon, and Iron Age smiths would occasionally make it by accident. The weapons made from this accidental steel were highly prized and considered gifts from the gods. In some cultures, these weapons were the only ones given names. There were some civilizations that discovered the secret to making steel, but they usually guarded it closely and prevented the knowledge from spreading. There is evidence of limited production from Anatolia from as far back at 1800 B.C. [5]
The Roman ensured their legions were equipped with steel. Their weapons were far superior to those made of iron, and they recorded that when they were fighting the Celts, their opponents had to step on their swords to straighten them after two or three swings.
The earliest and most consistent production of high carbon steel took place in southern India. Known as Seric Iron or Wootz steel, it was exported to the Romans, Egyptians, Arabs, and Chinese. [6] Later this type of steel was called Damascus, a type that is still prized today for its durable sharp edge. Eventually, the knowledge of how to create steel disseminated throughout the Old World, across Asia, the Middle East, Africa, and Europe. Steelmaking would be the backbone of the Industrial Revolution and the material used to build much of the infrastructure of the modern world.


I hope this was helpful. Let me know if you have questions or suggestions by using the Contact Me form on my website or by writing a comment. I post every Friday and would be grateful if you would share my content.
If you want my blog delivered straight to your inbox every month along with exclusive content and giveaways, please sign up for my email list here.
Let’s get writing!
Copyright © 2022 Rebecca Shedd. All rights reserved.
[1] The New Oxford Dictionary of English (1998) ISBN 0-19-861263-X, p. 301: “Chalcolithic /,kælkəl'lɪθɪk/ adjective Archaeology of, relating to, or denoting a period in the 4th and 3rd millennium BC, chiefly in the Near East and SE Europe, during which some weapons and tools were made of copper. This period was still largely Neolithic in character. Also called Eneolithic... Also called Copper Age – Origin early 20th cent.: from Greek khalkos 'copper' + lithos 'stone' + -ic”.
[2] “Serbian site may have hosted first copper makers”. UCL.ac.uk. UCL Institute of Archaeology. 23 September 2010. Retrieved 22 April 2017.
[3] James E. McClellan III; Harold Dorn (2006). Science and Technology in World History: An Introduction. JHU Press. ISBN 978-0-8018-8360-6. p. 21.
[4] “El bronce y el horizonte medio”. lablaa.org. Archived from the original on 17 April 2009. Retrieved 22 March 2010.
[5] Akanuma, H. (2005). “The significance of the composition of excavated iron fragments taken from Stratum III at the site of Kaman-Kalehöyük, Turkey”. Anatolian Archaeological Studies. Tokyo: Japanese Institute of Anatolian Archaeology. 14: 147–158.
[6] Srinivasan, Sharada (1994). “Wootz crucible steel: a newly discovered production site in South India”. Papers from the Institute of Archaeology. 5: 49–59. doi:10.5334/pia.60.
Writer’s Deep Dive: Anvils
Posted on August 19, 2022 2 Comments

The anvil is an essential piece of a blacksmith’s equipment and the most iconic symbol of the trade. They may look simple, but there is an incredible amount of clever design that goes into this piece of technology.
Now, let’s dive in!
The Basics
The first anvils were made of stone, then bronze, then wrought iron. As steel became commonplace, iron anvils were faced with it. Most modern anvils are made of forged or cast steel. Steel provides a hard working surface that prevents the anvil from deforming under the repeated impacts and reduces the amount of force lost with each hammer blow.
Early anvils were a simple block. The shape we are familiar with today is the London pattern anvil from the mid-19th century.
The standard anvil is made of these parts:
Face – This is the flat top that is the primary work surface. It has rounded sides that will not cut into the metal. The face is hardened and tempered. Striking the anvil face with full force is discouraged since it can chip or deform it.
Horn – The rounded horn is used to bend metal into curved shapes. It can also be used for drawing. Some anvils have two horns, one rounded and the other square. Others have side horns or clips.
Step – The transition between the horn and the face is the step, since it “steps” down. It is soft and used as a cutting surface.
Hardy Hole – A square hole in the face that is used for punching, bending, and holding a variety of tools called hardy tools.
Pritchel Hole – A hole in the face smaller than the hardy hole that is mainly used for punching.
Most anvils made since the late 18th century have hardy and pritchel holes while European medieval anvils do not.

It is critical for the anvil to have a sturdy base that could withstand the impacts and fire of the forge. Large logs or a big piece of timber are traditional and still common today. Often several feet of the base are buried in the floor to prevent it from moving or falling over. The anvil is secured to the base using spikes, chains, large staples, metal straps, or any other method the smith could come up with.

The anvil was placed close to the forge, so the smith didn’t have to walk far with rapidly cooling metal.
During the Middle Ages, a common practice among blacksmiths was to strike the metal three times, then lightly tap the anvil face. When closing their shops on Saturday, smiths would commonly strike the anvil face three times, although not with full force. Both practices were thought to scare away the devil and witches.
The Write Angle
If you have a character who is a blacksmith, describing them using the different parts of the anvil shows they are skilled at their craft. Also, knowing the different techniques and the parts of the anvil used to achieve them can add interest to a forging scene. It’s more interesting than “he forged the axe head.”
You could write a forge accident where the anvil is not properly secured and falls off the base or the base and anvil topple over.

I hope this was helpful. Let me know if you have questions or suggestions by using the Contact Me form on my website or by writing a comment. I post every Friday and would be grateful if you would share my content.
If you want my blog delivered straight to your inbox every month along with exclusive content and giveaways, please sign up for my email list here.
Let’s get writing!
Copyright © 2022 Rebecca Shedd. All rights reserved.

The Writer’s Guide to Blacksmithing Basics
Posted on August 5, 2022 5 Comments

Since much of fantasy was inspired by the Middle Ages, it makes sense that many novels include blacksmiths. Of course, in a magical setting, blacksmiths can be elevated from hammering out horseshoes to crafting magic rings or enchanted blades. It is also common to see them highlighted in visual medium during the big “gearing up” scenes.
Unfortunately, a lot of misinformation about blacksmithing is repeated in literature. In this series, I will break down the basics, telling the history, explaining the metals, and busting the myths of blacksmithing.
As always, magic is the exception to the rule. Because magic.
Forge and Tools
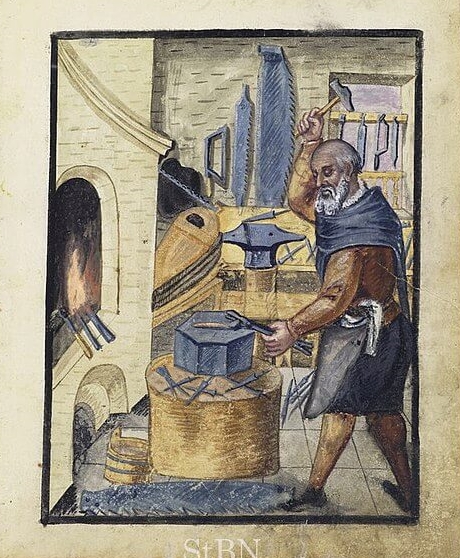
A blacksmith’s workspace is a forge or smithy. It commonly had a roof and possibly some walls. The roof was vital for shade, providing enough darkness to easily see the color of the metal. It also kept off the sun and rain. In most climates, walls were not needed since the forge provided enough heat.
The hearth where the blacksmith heats metal is also called the forge. Throughout most of history, coal was burned, although wood was also used, and modern smiths employ propane. The fire is stoked with a bellow, which blows air into the base. The modern equivalent is a blower, either hand cranked or electric.
Hot metal is carried and gripped using tongs and hammers of various weights are used to shape it. The anvil is the common work surface. I will do a Deep Dive into them in my next article.
Blacksmiths commonly wear leather aprons to protect themselves from the heat and dirt.
Cold and Hot Forging
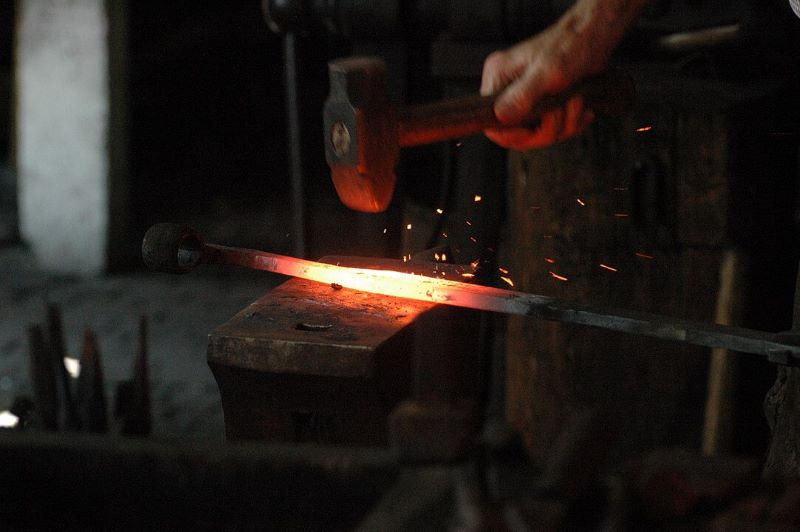
The most familiar type is hot forging, in which a smith heats a piece in the forge and works it while it is hot. The metal is nestled into the coals to heat before being moved to the anvil. Temperature and malleability of the metal can be determined by the color, starting red, turning orange, then yellow and last, white. Most forging happens when the metal is bright yellow-orange.
Cold forging involves no heat, only hammering. Copper and bronze can only be hardened by working it cold for a long period.
Forging Techniques
There are seven basic techniques to achieve the desired shape.
Drawing – Probably the most common blacksmithing operation, drawing out causes the billet to become thinner and longer. The piece can also become wider.
Bending – Metal can be bent to create either angles or curves. The anvil is an important tool when bending metal.
Upsetting – The technique causes the metal to become thicker on one end by shortening the other side. Upsetting can be performed by hammering on either the hot or cold side.
Punching – This operation produces a hole in the metal. A punch, a type of chisel with a rounded tapering head would be rested against the hot metal and hammered through. Widening the hole is called drifting and uses a series of increasingly larger punches. If a split is desired, a chisel is used. It is also used to cut the metal.
Swaging – This technique involves forcing either hot or cold metal through a die to produce shapes too intricate to make with a hammer alone.
Welding – Using this process, two pieces of metal are joined. To achieve this, the pieces must be clean and free of forge scale. Then the metal is heated until it is a bright yellow or white. The smith must be careful not to overheat the metal or it will burn or melt. Flux is used to carry scale out of the weld and protect the metal from burning. Flux is typically powdered borax, silica sand, or a mixture of the two. The two pieces are hammered together until a weld forms, often causing a lot of sparks.

Heat Treating and Quenching
Heat treating is a method to harden or soften metal. There are several techniques including annealing, case hardening, precipitation strengthening, tempering, carburizing, and normalizing. These methods can be applied to the entire piece or portions of it.
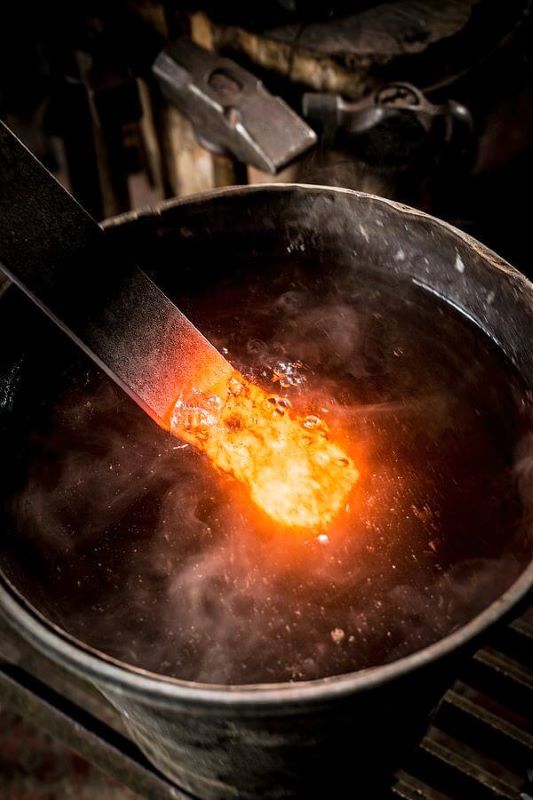
The most well-known heat treatment method, and commonly, the last step in the forging process is quenching. The metal is heated to between 1,500 and 1,650° F (815-900°C) then submerged in water or oil, rapidly cooling it. This hardens the metal. However, the process is incredibly stressful to the metal, which can warp, crack or break.
Finishing
After hardening, the piece is brushed and filed to remove burrs and sharp edges. The rest of the finish process depends on what the item is, such as sharpening and attaching a handle on knives and swords.
I hope this was helpful. Let me know if you have questions or suggestions by using the Contact Me form on my website or by writing a comment. I post every Friday and would be grateful if you would share my content.
If you want my blog delivered straight to your inbox every month along with exclusive content and giveaways, please sign up for my email list here.
Let’s get writing!

The Writer’s Guide to Medieval Army Logistics
Posted on July 22, 2022 6 Comments

Raising an army and learning how to deploy it tactically will only get your protagonist so far. To keep your army in the fight, he or she will have to supply it. This can be a challenge, especially in a pre-industrial world without automobiles, trains, or airplanes. History again can provide us with a wealth of inspiration.
As always, magic is the exception to the rule. Because magic.
Equipping an Army
For an army to be effective, it must be equipped with weapons and armor. All modern standing armies provide their soldiers with everything, including weapons, equipment, and clothing. But throughout most of the ancient and medieval periods, soldiers were required to provide their own clothing, weapons, armor, and even food. The Romans were a notable exception. Under the Visigoth legal code (circa 680), soldiers were expected to bring their own armor and shields. In a letter, Charlemagne recorded that horsemen must provide “a shield, lance, sword, dagger, bow, and quivers with arrows.” [1] A law passed in 1252 required all Englishmen aged 15 to 60 to own a bow and arrows. It was mandatory for knights going on crusade to bring a string of horses.
Soldiers could also buy what they needed from merchants and craftsmen along the way or at their destination. [2] Goods and services included shoeing for their horses and metal, wood, and leather goods. During the First War of Scottish Independence, which began in 1296, sheriffs in Scotland and Wales would forcefully buy food, horses, and carts from merchants, paying low prices. The goods were transported to the border where English conscripts could purchase them. In the early 1300s, the English had a system where merchants were asked to meet the army. However, the merchants often used this an opportunity to charge outrageous prices. [3]
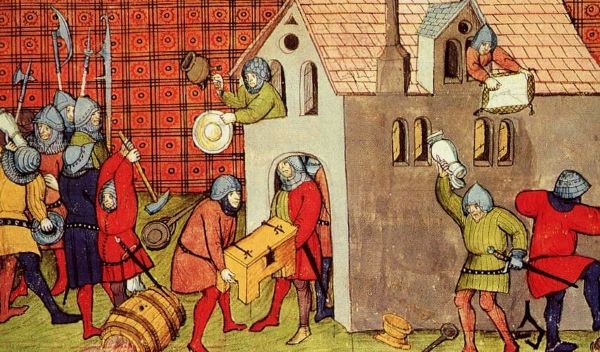
Of course, looting and pillaging were another way for soldiers to acquire goods. It was common during the Middle Ages for armies to loot villages and cities they captured and to pillage the countryside while they were on the march.
Feeding an Army
As the saying goes, “an army marches on its stomach.” Yet most ancient and medieval armies required their soldiers to feed themselves. For example, the Carolingians in the 8th century required their soldiers to bring enough food for three months. If they still needed them after their food ran out, they would provide it for free. Other countries would provide food, but it was instead of wages. [4] Saxon soldiers during the German civil war in the 1070s were required to bring enough supplies for the entire campaign. [5] Food was commonly transported in carts or on pack animals. Herds of cattle were also used to provide fresh meat. According to Bernard Bachrach in “Military Logistics: Carrying Food Supplies,” a herd of 1,000 cattle could feed an army of 14,000 for roughly ten days. [6]
Food could also be bought from local merchants or farmers, or foraged or looted from the countryside.

The Baggage Train
The baggage train was a civilian contingent that transported the supplies that the soldiers were not carrying themselves. Members of the train could also provide goods and services to the army, including blacksmiths, cobblers, laundresses, and prostitutes. Often medical personnel traveled with the baggage train as well as the wives and children of the soldiers. The train was often vulnerable, such as when the French attacked the English baggage train at the battle of Agincourt.

Campaign Season
Although modern armies fight year-round, ancient and medieval armies only fought during the campaign season, which started in spring and ended in autumn. This ensured that the fields would still be planted and harvested, preventing starvation. It provided logistical challenges since armies had to be transported to the battlefield in the spring and home again in the autumn. This was especially challenging if it involved distance or an ocean journey, such as crossing the English Channel to fight in France. It was also a challenge to commanders when all their soldiers decided they had to go home to harvest the crops.
Even if an army stayed together through the winter, it was unlikely they would do any fighting unless they were in a warm climate. For areas that experienced snow and inclement weather, the army would be idle and had to be housed, warmed, and fed. Unless a reliable supply line existed or the army was camped in an area with plentiful resources, this situation often resulted in a hungry, miserable winter. General George Washington’s winter camp at Valley Forge is a good example.

I hope this was helpful. Let me know if you have questions or suggestions by using the Contact Me form on my website or by writing a comment. I post every Friday and would be grateful if you would share my content.
If you want my blog delivered straight to your inbox every month along with exclusive content and giveaways, please sign up for my email list here.
Let’s get writing!
Copyright © 2022 Rebecca Shedd. All rights reserved.
[1] Halsall, Paul. “Medieval Sourcebook: Charlemagne: Summons to Army c.804-11”. sourcebooks.fordham.edu. Retrieved 2020-11-12.
[2] Bachrach, Bernard S.; Bachrach, David S. (2017). “Military Logistics: Arms and Equipment”. Warfare in Medieval Europe c.400-c.1453. Abingdon, Oxon: Routledge. ISBN 9781138887664.
[3] Abels, Richard. “War in the Middle Ages: Medieval Logistics – English Experience”. United States Naval Academy. Archived from the original on 13 April 2016. Retrieved 3 October 2017.
[4] Abels, Richard. "War in the Middle Ages: Medieval Logistics – English Experience". United States Naval Academy. Archived from the original on 13 April 2016. Retrieved 3 October 2017.
[5] Bachrach, Bernard S.; Bachrach, David S. (2017). "Military Logistics: Supplies Carried by Militia Troops". Warfare in Medieval Europe c.400-c.1453. Abingdon, Oxon: Routledge. ISBN 9781138887664.
[6] Bachrach, Bernard S.; Bachrach, David S. (2017). "Military Logistics: Carrying Food Supplies". Warfare in Medieval Europe c.400-c.1453. Abingdon, Oxon: Routledge. ISBN 9781138887664.
Writer’s Deep Dive: The Battle of Hastings
Posted on July 8, 2022 3 Comments

For our third and final historical battle, I am covering the Battle of Hastings. This engagement shows how an army can start in a dominate position and still lose.
Now, let’s dive in!
The Basics
The battle of Hastings was fought on October 14th, 1066 between the Anglo-Saxon King Harold Godwinson and the invading Norman-French William, Duke of Normandy. The previous king of England, Edward the Confessor, had died on January 5th, 1066, leaving no heir. [1]
Harold was crowned king of England on January 6th, 1066 and immediately braced for a challenge from William. He raised the fyrd across England. [2] The fyrd was a system of obligation and service, a variation of “calling vassals” or “raising the banners,” as George R. R. Martin puts it in A Song of Ice and Fire. To read more about this method of raising an army, please see my Writer’s Guide Raising a Medieval Army. The entire national fyrd had only been raised three times in the previous nineteen years. [3] The fyrd was supplemented by the king’s personal soldiers, known as housecarls. Several nobles also had housecarls. Most of these forces fought on foot and the English had few archers.
Harold was surprised by an invasion by the Norwegian King Harald Hardrada and his own brother, Tostig, in the north. He defeated them at the Battle of Stanford Bridge on September 25th, 1066 after an impressive forced march. William landed his forces from France at Pevensey on September 28th, 1066, and Harold had to race his army south to confront them. Unfortunately, we are not certain of the size of each army since the contemporary accounts vary widely. [4] Half of Williams’ forces were foot soldiers, the other half equal numbers of cavalry and archers. [6]
Harold tried to surprise the Normans but was spotted by William’s scouts. The English took up a defensive position at the top of Senlac Hill, with their flanks protected by woods. They formed a long shield wall. The duke led his army out of the castle he had hastily constructed in the ruins of a Roman fort. [5] He divided his army into three groups, with archers in the front ranks and foot soldiers behind with the cavalry held back in reserve. [7]

“Stand fast! Stand fast!” The Battle of Hastings, 1966 by Kenneth M. Setton. Image source.
William began the battle with volleys of arrows from his archers. However, the steep uphill angle caused most of the arrows to either bounce off the English shields or fly harmlessly over their heads. [8] They also quickly went through their supply of arrows and since there were few archers among Harold’s army, they couldn’t gather and reuse English arrows. [9]
The Norman spearmen attacked next but were hampered by the steep slope and pummeled by spears, axes, and stones. William sent the cavalry next but they also had little effect. The Normans began retreating and a rumor flew through the ranks that William had been killed. The duke had to remove his helmet and ride around his forces to prove that he still lived. [10] Several of the English pursued the retreating Normans and were cut off from the shield wall and killed.

William sent his cavalry against the English line again in the afternoon. They charged and then withdrew twice, drawing English soldiers into pursuit, thinning the line. [11] Harold was killed late in the battle and the English line collapsed with many soldiers fleeing. The soldiers of the royal household, however, defended Harold’s body to the last man. [12]

The Write Angle
Harold nearly pulled off one of the greatest victories in English history. He marched his army from London to York in four days to confront Harald Hardrada and Tostig only to turn around and march it back to confront William. If the English had held their shield wall and not been baited into pursuing the Normans, it’s possible they could have won the battle of Hastings. They also had a moment to turn the tide when the Normans thought that William had been killed but didn’t take advantage of it.
Hastings proves that battles can hinge on small things and that an army can go from winning to loosing in a moment. As a writer, this battle can be such a source of inspiration in crafting events that organically swing from victory to defeat and back again.
I hope this was helpful. Let me know if you have questions or suggestions by using the Contact Me form on my website or by writing a comment. I post every Friday and would be grateful if you would share my content.
If you want my blog delivered straight to your inbox every month along with exclusive content and giveaways, please sign up for my email list here.
Let’s get writing!
Copyright © 2022 Rebecca Shedd. All rights reserved.
[1] Higham Death of Anglo-Saxon England pp. 167–181
[2] Nicolle Medieval Warfare Sourcebook pp. 69–71
[3] Marren 1066 pp. 55–57
[4] Gravett Hastings pp. 20–21
[5] Lawson Battle of Hastings pp. 180–182
[6] Gravett Hastings p. 27
[7] Bennett Campaigns of the Norman Conquest p. 41
[8] Bennett Campaigns of the Norman Conquest p. 41
[9] Gravett Hastings pp. 65–67
[10] Gravett Hastings p. 68
[11] Marren 1066 p. 130
[12] Gravett Hastings pp. 76–78
